Hello friends welcome to the Techtspot blog, today I will show you how to insert or add a Popular Posts gadget to the Blogger blog with pictures.
Why we need to add the Popular Posts gadget to the blog?
A popular post gadget helps our blog to easily add popular posts (popular posts are most visited blog posts) it is very important because all the popular posts are shown in one place and using popular posts our visitors easily find out which kind of posts are recently popular then we can easily visit the posts.
This widget is provided by the Blogger platform and when we add the Popular posts gadget to our blog then we can easily customize the gadget using the most viewed option, we can also add a thumbnail, add snippets, and a maximum number of shown posts, now I add 2 popular post gadgets to my blog but how? and why?
I configure them using the Most viewed option actually in 1st popular for a gadget I add Last 7 days option which means it shows only the last 7 days' most popular posts and in the 2nd one I select Last year option that means all content which is popular in last year are showed in 2nd gadget.
Now, these gadget helps to maximize our visits to these popular content, most of the user are also visit these popular top 10 content they also want to know what type of content popular in that blog, so you can use 2 popular post gadget as I did, now let's start.
These are the Following Steps:-
Step
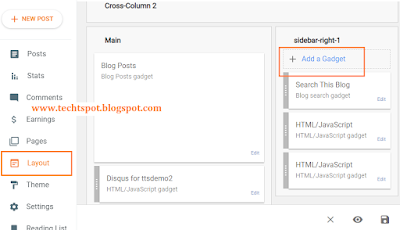
1: First go to the blogger blog dashboard and click the Layout option here you find out the place where you want to add a popular pose gadget and then click add a gadget link.
Step
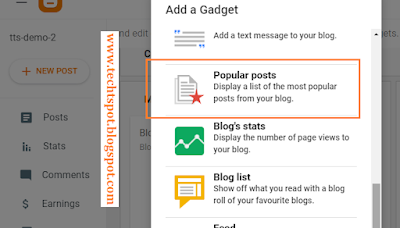
2: Here a new window appears middle of your device screen now you find out the popular posts gadget option and click it.
Step
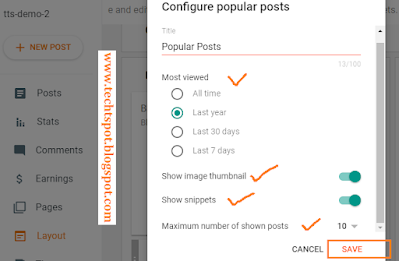
3: Now you can customize your popular post like you can allow or not allow thumbnail, snippet, and also select a maximum number of posts or you can see my given image to get an idea and click the Save button.
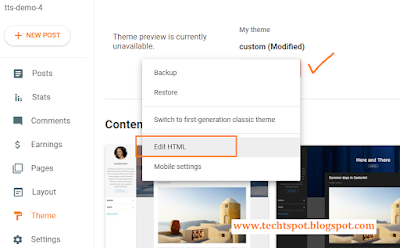
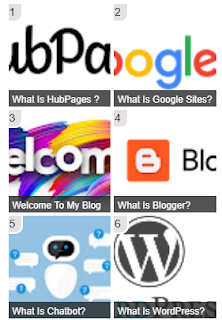
Now the popular posts gadget is visible in your blog with the normal layout but if you make it more stylish then I give you stylish Popular Posts gadget codes with the output image you can choose which suit for your blog and select and apply in your blogger blog but before that, you have to back up your blogger blog theme.
Step 5: Here we click anywhere in the code and press the Ctrl+F button and find out "</b:skin>" code when you get the code make some space above the </b:skin> code and paste the Popular Posts code which you like and at last click the Save button.
>Popular Posts gadget Style-1:-
.sidebar .popular-posts ul {padding: 0;margin: 0;counter-reset: popcount;} .sidebar .popular-posts ul li {list-style: none !important;float: left;font-family:'Oswald',Arial,Tahoma,sans-serif;position: relative;width: 48%;height: 130px;overflow: hidden;margin: 2px;padding: 0 !important;border: 0;} .sidebar .PopularPosts .item-thumbnail {width: 100%;margin: 0;} .sidebar .PopularPosts ul li img {float: left;display: block;height: 130px;width: 100%;padding: 0;-webkit-transition-duration: 1.0s;-moz-transition-duration: 1.0s;-o-transition-duration: 1.0s;transition:1.0s;} .sidebar .PopularPosts ul li img:hover {overflow: hidden;transform:scale(1.06);-webkit-transform:scale(1.06);-moz-transform:scale(1.06);-o-transform:scale(1.06);} .sidebar .PopularPosts .item-title {position: absolute;right: 0;left: 0;bottom:0;padding-bottom: 0;z-index: 999;} .sidebar .PopularPosts .item-title a {display: block;padding: 5px 0px 2px 5px;background: rgba(32, 32, 32, 0.77);text-transform: capitalize;font-size: 12px;color: #fff;line-height: normal;transition: all .4s ease-in-out;} .sidebar .popular-posts ul li:hover .item-title a {background: rgba(231, 76, 60, 0.88);color: rgba(255, 255, 255, 1);text-decoration: none;} .sidebar .popular-posts ul li:before {counter-increment: popcount;float: left;position: absolute;content: counter(popcount, decimal);list-style-type: none;background: #e2e2e2;top: 0;font-size: 14px;color: #000;line-height: 20px;padding: 0px 8px 1px 1px;z-index: 4;border: solid #FFF;border-radius: 0px 0px 10px 0px;border-width: 0px 2px 2px 0px;}
>Popular Posts gadget Style-2:-
.popular-posts ul{padding-left:0px;} .popular-posts ul li {list-style-type: none;background: #FFF url(https://blogger.googleusercontent.com/img/b/R29vZ2xl/AVvXsEgl_Zq4zK-FZaxAb3A-YDjysOo-QBSA38weIR7z8Dh6JQbE85auolQ_HPki6lvdrH_anE_7lzSU3ItMPeb4Aq00RqgSMiCsl3lDj6xQ91Pdx_m6kzqDWS1RvHR9_Jl5Yg-Rny0e97pR2ent/s1600/bo-pp-arrow.gif) no-repeat scroll 5px 10px;border: 1px solid #ddd;padding:5px 5px 5px 20px !important;margin:0 0 5px 0px;border-radius:10px;-moz-border-radius:10px;-webkit-border-radius:10px;} .popular-posts ul li:hover {border:1px solid #6BB5FF;} .popular-posts ul li a:hover {text-decoration:none;} .popular-posts .item-thumbnail img {border-radius: 100px;-moz-border-radius: 100px;webkit-border-radius: 100px; box-shadow: 0 1px 3px rgba(0, 0, 0, .4);-webkit-box-shadow: 0 1px 3px rgba(0, 0, 0, .4);-moz-box-shadow: 0 1px 3px rgba(0, 0, 0, .4);}
Step 6: Now open the Blogger blog to check the results.
Now Visit the - Demo Blog to see the result.
Above I give you my demo blog link, where I enable the Popular Posts widget, if you are thinking to set up a Popular Posts gadget in your blog then first look at the gadget how it looks like in my demo blog.
Read More:-
How to Add Footer Credit Link widget to Blogger blog
How to Transfer Blog to Another Blogger Account
How to Add Back To Top Button to Blogger blog
How to Add Author Profile widget to Blogger blog
I hope you enjoy this Post. If any problem comment it.
How to Add Footer Credit Link widget to Blogger blog
How to Transfer Blog to Another Blogger Account
How to Add Back To Top Button to Blogger blog
How to Add Author Profile widget to Blogger blog
I hope you enjoy this Post. If any problem comment it.




nice post i added this widget to my blog www.allrounderlab.blogspot.com now i am very happy.
ReplyDeletethanks ..
ReplyDeleteThis is a great inspiring article.I am pretty much pleased with your good work.You put really very helpful information. Keep it up. Keep blogging. Looking to reading your next post. Blogged Topics
ReplyDeletethanks for comment :)
Delete