Hello friends welcome to the Techtspot blog, today I will show you how to insert or add an Author Bio widget to the Blogger blog with pictures.
What is the Author Profile widget?
Author profile gadget help us to display our information means author information to our visitors, when we have multiple authors in our blog then the gadget help to find out which writer or author write the article.
Why we need to add an Author Profile widget to the blog?
Above I tell you the main reason to add the author profile box to the blog, it is very useful to recognize the author, when visitors are very used to reading a post then they can also find out the author's profile to check out the author info and their other profiles, for example, other blog or website, and social media profiles to get the information about the author and follow.
Now the other prospect is whenever your content or an article gets a lot of shares on various social media networking sites then some of the companies are also reading your fabulous written article and they like your writing style then they can easily contact you because of the author profile gadget.
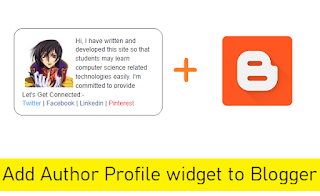
Now the author profile widget or gadget, here blogger platform has a profile gadget, when we are adding the profile gadget in the blog it will display author information but it is not attractive or looking wise it is a very simple gadget, so here I give you the custom author profile widget, this helps you to display the author information in a very lucrative way, now let's start.
These are the Following Steps:-
Step
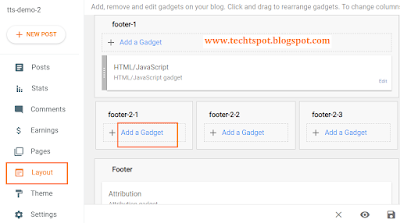
1: Now first I will display to you how to add a blogger profile gadget to your blog, open the blogger blog dashboard and click the Layout option, here you just find out where you want to add your profile gadget then click the Add a Gadget link.
Step
2: Now in this scenario, you will find out the Profile gadget option and click it.Step 3: Here do some configurations like put the title that you want to and click the Show about me button then click the Save button, now open your blogger blog to check the profile gadget.
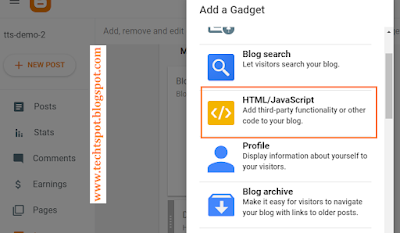
Step 4: Now the Profile gadget suits your blogger blog theme then it is ok, but if you want to add some information about you and add some social media buttons in that gadget it is not possible in the profile gadget, so here I give you the second option it is a custom author profile widget option, now again find out the place where you want to add the custom author profile widget then click the Add a Gadget link and click the HTML/JavaScript option.
Step 5: Now you paste the custom author profile widget code in the content area and click the Save button, but before adding the custom profile gadget, in the code, you add your profile picture and edit your social media profile as well.
Custom Author Profile Widget Code:-
<style>#img1{padding: 5px 5px 5px 5px; height: 100px; width: 100px;}</style><div class="about-author"><h3>About Author</h3><img id="img1" align="left" src="https://lh5.googleusercontent.com/-a5vcUW_A9BM/AAAAAAAAAAI/AAAAAAAAAhc/t-ubxyVOWEs/s80-c/photo.jpg"/><p> Hi, I have written and developed this site so that students may learn computer science related technologies easily. I'm committed to provide easy and in-depth tutorials on various technologies. No one is perfect in this world and nothing is eternally best. But we can try to be better. I hope it will help you a lot.</p><p>Let's Get Connected:- <br/><a href="http://twitter.com/" rel="nofollow" target="_blank"><font color="#00acee">Twitter</font></a> | <a href="http://www.facebook.com/" rel="nofollow" target="_blank"><font color="#4267B2">Facebook</font></a> | <a href="http://linkedin.com/" rel="nofollow"><font color="#0e76a8">Linkedin</font></a> | <a href="http://pinterest.com/" rel="nofollow"><font color="#E60023">Pinterest</font></a></p></div>
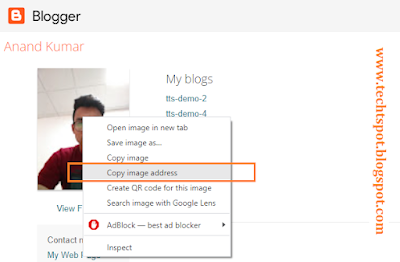
Note:- Here you can replace your Author image URL with Red URL and you can also replace your social media links with blue URLs, now you can visit the blogger profile and right-click on your profile image, and click the copy image address option to get your profile image address.
Step 6: Now open the Blogger blog to check the results.
Now Visit the - Demo Blog to see the result.
Above I give you my demo blog link, where I enable the profile and custom profile gadget, if you are thinking to set up the author profile widget in your blog then first look at the gadget how it looks like in my demo blog and you can easily compare the simple profile gadget and the custom author profile gadget as well.
Read More:-
How to Add Back to Top Button in Blogger blog
Embed Instagram photos widget to Blogger blog
How to Create Labels in Blogger blog
How to Add Google Translate to Blogger blog
I hope you enjoy this Post. If any problem comment it.
How to Add Back to Top Button in Blogger blog
Embed Instagram photos widget to Blogger blog
How to Create Labels in Blogger blog
How to Add Google Translate to Blogger blog
I hope you enjoy this Post. If any problem comment it.


superb post ...
ReplyDeletethanks for comment
Deleteuh i finally got good solution with author profile was struggling with getting good.
ReplyDeleteThanks
How can we change the font and color for introduction text
ReplyDeletethanks for comment and
Deletewe can change the font and color using < font color="#00aced" > here your introduction text < /font >
ok
< font color="#00aced" > here your introduction text < /font >
DeleteAwesome Author Bio code sir it work....
ReplyDeletethanks for comment
Deleteand sir video is awesome
ReplyDeletethanks for comment
DeleteHow can we place it in post footer?
ReplyDeletehello sir
DeleteInserting the author box in post footer
1. Go to theme
2. Click on Edit HTML
3. Find the line >> "post-footer-line-3"
4. Paste your code ABOVE the line containing this code.
5. Save theme
6. Open you blog :)
< /b:includable >
Delete4. Paste your code ABOVE the line containing this < /b:includable > code.
DeleteDoesn't work in my blog. Help Me Yarrr
ReplyDeletewhich steps you need help
DeleteBhai agar post ke niche add karna hoo to kaise kare
ReplyDeletehello
DeleteInserting the author box in post footer
1. Go to theme
2. Click on Edit HTML
3. Find the line >> "< data:post.body/ >" then enter 2 times
4. Paste your code ABOVE the line containing this code.
5. Save theme
6. Open you blog :)
I have two questions, please:
ReplyDelete1 - How can I show the button of read more to make some of the visitors of my blog go to about us page for more information?
2 - How can I show the images of social media icons instead of their names to make them more attractive?
Hello there
DeleteRead More Button >> click here
read more button for blogger ||
Social Media Icons >> Click here add social media button for blogger
Thanks
I mean how to add the previous gadgets into the author bio box that is inserted under blog posts.
DeleteHi It doesn't worked for me.I followed the entire steps but nothing got changed. It still not showing by bio
ReplyDeleteHello
Deleteplease try again because i just paste the code in my blog and other blog (twice) it work for me Thanks :)
Great
ReplyDeletewww.urdushayyari.com
approval nhi mil ra sir video bnain
hello
Deleteplease me the proper problem :)
Thanks
"above i miss some words" :)
DeleteSO
write the proper problem below
thanks great article
ReplyDeleteThanks for comment :)
DeleteVery helpful information thanks for sharing
ReplyDeleteThanks For Comment :)
Deleteit is much knowledgable
ReplyDeleteThanks For Comment :)
DeleteI would like to ask you a question.
ReplyDeleteHow do you make blogspot approved by Google Adsense?
it is very simple FIRST you make a blog then write a content then after you get some good result on it like 1000 pageview per day then apply Google Adsense thanks
DeleteAwesome write up.. Visit NairaTechs Blog for all network free browsing cheats, apps and apps solutions, blogging tips and more👇
ReplyDeleteNaira Techs
thanks for comment :)
DeleteAwesome! Nice work, this Tutorial is very Helpful for everyone.
ReplyDeletethanks for comment :)
DeleteGreat Content & Info
ReplyDeletethanks for comment :)
DeleteHi, So easy and well explain. I am able to upload my photo to blogger. That really a Great article. Thank you for sharing.
ReplyDeletethanks for comment :)
Deletesuch a piece of great information for bloggers Keep it up.
ReplyDeletelooking for coworking office ?
Coworking space in Jaipur
#coworkingspace #CoworkingspaceinJaipur
thanks for comment :)
Delete