Hello friends welcome to the Techtspot blog, today I will show you how to display the Blogger blog posts in grid view with thumbnails.
What is Grid View with Thumbnails?
A grid view with a thumbnail (thumbnail grid) means your posts will show in a grid with an image like someone visited your blog home page they see all your post in little boxes with images and titles.
Why we need to add Grid View for blog posts?
When we start blogging first we set up our blogger blog and then looking for a beautiful template or theme for our blog, we see a lot of third party themes with different styles but when we like and download the grid view style theme but when we install the theme in our blog then a lot of other gadget and widgets are automatically installed.
Removing Tthese gadgets are very difficult and some gadgets are not deleted and most of the gadgets are not required they just installed in our blogger blog theme, so here I give you the solution and I provide you a code that enables your blogger blog posts in grid view with thumbnails, now let's start.
These are the Following Steps:-
Step
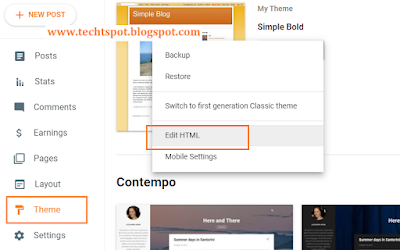
1: Go to the blogger blog dashboard and click the Theme layout, now click customize dropdown button and click the Edit HTML button.
Step
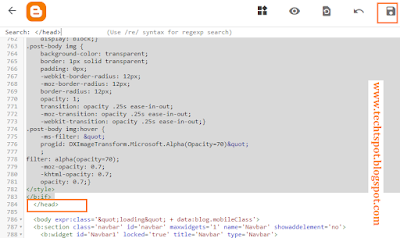
2: Here click anywhere in the code then press the CTRL+F button and find the "</head>" tag then paste the grid view code above the </head> tag and click the Save button.
<script src="http://code.jquery.com/jquery-1.9.1.js"></script>
<script src="http://code.jquery.com/jquery-migrate-1.1.0.js"></script>
<b:if cond='data:blog.pageType == "index"'>
<script type='text/javascript'>//<![CDATA[
$(document).ready(function() {
var width = 200;
var height = 200;
var placeholder = 'https://blogger.googleusercontent.com/img/b/R29vZ2xl/AVvXsEjN38x2bS7VXXM3A8ADUOg0HDYBuJtsuwkYmLH2ahI21_7R0J7aQtqRPOkepJhomEcgQADeT5J8uEGe0fdKItqVEoGloFUwWQUEU0et22FTLx4ph9cjQXfloMcHoOND0sGVB3DIbkWCDOU/s1600/no-thumb.png';
var margins = "0px 0px 10px 10px";
var fitThumb = 1;
var titleTopPadding = 5;
var titleBottomPadding = 20;
var titleLeftRightPadding = 5;
var titlePadding = titleTopPadding + 'px ' + titleLeftRightPadding + 'px ' + titleBottomPadding + 'px ' + titleLeftRightPadding + 'px';
$('.post-body').each(function(n, wrapper) {
var wrapper = $(wrapper);
var image = $(wrapper).find('img').first();
var link = wrapper.parent().find('h3 a');
var linkURL = link.attr('href');
var linkTitle = link.text();
$(link).remove();
wrapper.empty();
if (image.attr('src')) {
var thumbHeight = image.attr('height');
var thumbWidth = image.attr('width');
var thumbParent = $(image).parent();
wrapper.append(thumbParent);
if (fitThumb) {
image.attr({
src: image.attr('src').replace(/s\B\d{3,4}/, 's' + width + '-c')
});
image.attr('width', width).attr('height', height);
} else {
image.attr({
src: image.attr('src').replace(/s\B\d{3,4}/, 's' + width)
});
image.attr('width', width);
var changeHeight = (thumbHeight / thumbWidth * width).toFixed(0);
image.attr('height', changeHeight);
}
} else {
var image = $('<img>').attr('src', placeholder).attr('height', height).attr('width', width);
var thumbParent = $('<a>').append(image).appendTo(wrapper);
}
thumbParent.attr('href', linkURL).css('clear', 'none').css('margin-left', '0').css('margin-right', '0').addClass('postThumbnail');
var thumbTitle = $('<div>').prepend(linkTitle).css('padding', titlePadding).css('opacity', '0.9').css('filter', 'alpha(opacity=0.9)').css('width', width).appendTo(thumbParent);
var ptitleHeight = thumbTitle.height();
var summary = parseInt(ptitleHeight) + parseInt(titleTopPadding) + parseInt(titleBottomPadding);
thumbTitle.css('margin-top', '-' + summary + 'px');
wrapper.css('float', 'left').css('height', height).css('width', width).css('margin', margins).css('overflow', 'hidden');
});
$('#blog-pager').css('clear', 'both');
});
function hideLightbox() {
var images = document.getElementsByTagName('img');
for (var i = 0; i < images.length;++i) {
images[i].onmouseover = function() {
var html = this.parentNode.innerHTML;
this.parentNode.innerHTML = html;
this.onmouseover = null;
};
}
}
if (window.addEventListener) {
window.addEventListener('load', hideLightbox, undefined);
} else {
window.attachEvent('onload', hideLightbox);
}
//]]>
</script>
<style>
.post {
border-bottom: 0 dotted #E6E6E6;
margin-bottom: 0;
padding-bottom: 0;
}
h2,.post-footer {
display: none;
}
a.postThumbnail div {
text-decoration: none;
color: #fff;
font-size: 12px;
font-weight: bold;
text-transform: capitalize;
background: rgb(125,126,125);
/* Old browsers */
background: -moz-linear-gradient(top, rgba(125,126,125,1) 0%, rgba(14,14,14,1) 100%);
background: -webkit-gradient(linear, left top, left bottom, color-stop(0%,rgba(125,126,125,1)), color-stop(100%,rgba(14,14,14,1)));
/* Chrome,Safari4+ */
background: -webkit-linear-gradient(top, rgba(125,126,125,1) 0%,rgba(14,14,14,1) 100%);
background: -o-linear-gradient(top, rgba(125,126,125,1) 0%,rgba(14,14,14,1) 100%);
background: -ms-linear-gradient(top, rgba(125,126,125,1) 0%,rgba(14,14,14,1) 100%);
background: linear-gradient(to bottom, rgba(125,126,125,1) 0%,rgba(14,14,14,1) 100%);
filter: progid:DXImageTransform.Microsoft.gradient( startColorstr='
#7d7e7d', endColorstr='#0e0e0e',GradientType=0 );}
a.postThumbnail:hover div {
display: block;}
.post-body img {
background-color: transparent;
border: 1px solid transparent;
padding: 0px;
-webkit-border-radius: 12px;
-moz-border-radius: 12px;
border-radius: 12px;
opacity: 1;
transition: opacity .25s ease-in-out;
-moz-transition: opacity .25s ease-in-out;
-webkit-transition: opacity .25s ease-in-out;}
.post-body img:hover {
-ms-filter: "
progid: DXImageTransform.Microsoft.Alpha(Opacity=70)"
;
filter: alpha(opacity=70);
-moz-opacity: 0.7;
-khtml-opacity: 0.7;
opacity: 0.7;}
</style>
</b:if>
Step
3: Now open your blog, if you get any problem with the grid view to viewing the posts then again go to the Theme option and click the customize dropdown button. On this page, you can see the drop-down buttons which are on the top left side of the webpage and you click Adjust widths dropdown, now adjust the width of your blog or sidebar.
Step 4: Now open the Blogger blog to check the results.
Now Visit the - Demo Blog to see the result.
Above I give you my demo blog link, where I am displaying my blog posts in Grid View with Thumbnails, if you are thinking to set up a Grid View in your blog then first look at how it looks like in the demo blog.
Read More:-
How to Create A Menu Bar in Blogger blog
How to Design Blogger blog Theme
Add Blogger blog to Bing Webmaster Tool
Add Blogger blog to Google Webmaster Tool
I hope you enjoy this Post. If any problem comment it.
How to Create A Menu Bar in Blogger blog
How to Design Blogger blog Theme
Add Blogger blog to Bing Webmaster Tool
Add Blogger blog to Google Webmaster Tool
I hope you enjoy this Post. If any problem comment it.


thanks
ReplyDeletethanks for comment :)
Deleteit really help me lot visit https://guest-posting.blogspot.com
ReplyDeletethanks for comment :)
ReplyDeleteWonderful article, Which you have shared about the ****. Your article is very important and I was really interested to read it. If anyone looking for Transparent Screen then visit Zoomvisual.com.sg, It’s the best choice.
ReplyDeletethanks for comment :)
Deletethanks
ReplyDeletethanks for comment :)
Delete