Hello friends welcome to the Techtspot blog, today I will show you how to add Responsive Bottom Sticky Ads in the Blogger blog with pictures.
Why we need to add Responsive Bottom Sticky Ads to the blog?
Bottom sticky ads mean the ads display on the bottom side of any webpage just like you can see my banner image the ad will display on the bottom side of the mobile device and it is a responsive ad that is perfectly open on the laptop, computer, and tablet devices, whenever visitors visit any posts, pages, and blog home page then the banner sticky ad will open by default and the user can easily close the ad.
On the blogger platform, there are some options to add Ads in the blog but the bottom sticky option is not available, so in this post, I give you the manual option to add the responsive bottom sticky ad option with a closing button for your blogger blog, now we talk about the benefit for example if you have good web traffic from different devices then this ad will be displayed perfectly to all devices it will increase the impression, page RPM (Page revenue per thousand impressions), and page CTR (clickthrough rate), now let's start.
These are the Following Steps:-
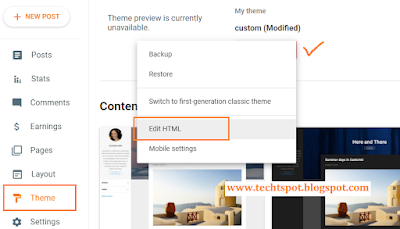
Step 1: First go to the blogger blog dashboard and click the Theme option, now we have to click the Customise dropdown button and select the Edit HTML option.
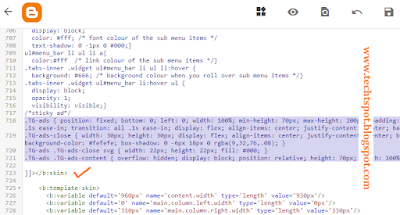
Step 2: Here we click anywhere in the code and press the CTRL+F button and find "]]></b:skin>" code and make some space above ]]></b:skin> code and paste the CSS style code here.
Responsive Bottom Sticky Ads Style code:-
.sticky-ads{ position: fixed; bottom: 0; left: 0; width: 100%; min-height: 70px; max-height: 200px; padding: 5px 0; box-shadow: 0 -6px 18px 0 rgba(9,32,76,.1); -webkit-transition: all .1s ease-in; transition: all .1s ease-in; display: flex; align-items: center; justify-content: center; background-color: #fefefe; z-index: 20; } .sticky-ads-close { width: 30px; height: 30px; display: flex; align-items: center; justify-content: center; border-radius: 12px 0 0; position: absolute; right: 0; top: -30px; background-color: #fefefe; box-shadow: 0 -6px 18px 0 rgba(9,32,76,.08); } .sticky-ads .sticky-ads-close svg { width: 22px; height: 22px; fill: #000; } .sticky-ads .sticky-ads-content { overflow: hidden; display: block; position: relative; height: 70px; width: 100%; margin-right: 10px; margin-left: 10px; }
Step 3: Now press again CTRL+F button and find the "</body>" tag then again we make some space above </body> tag and we add Ad code in the II code (I copy my affiliate Ad code and paste it in the II code ad space you can check my demo blog) then paste above the </body> tag and at last click the Save button and open your Blogger blog to check the Sticky Ad results.
Responsive Bottom Sticky Ads code:-
<div class='sticky-ads' id='sticky-ads'><div class='sticky-ads-close' onclick='document.getElementById("sticky-ads").style.display="none"'><svg viewBox='0 0 512 512' xmlns='http://www.w3.org/2000/svg'><path d='M278.6 256l68.2-68.2c6.2-6.2 6.2-16.4 0-22.6-6.2-6.2-16.4-6.2-22.6 0L256 233.4l-68.2-68.2c-6.2-6.2-16.4-6.2-22.6 0-3.1 3.1-4.7 7.2-4.7 11.3 0 4.1 1.6 8.2 4.7 11.3l68.2 68.2-68.2 68.2c-3.1 3.1-4.7 7.2-4.7 11.3 0 4.1 1.6 8.2 4.7 11.3 6.2 6.2 16.4 6.2 22.6 0l68.2-68.2 68.2 68.2c6.2 6.2 16.4 6.2 22.6 0 6.2-6.2 6.2-16.4 0-22.6L278.6 256z'/></svg></div>
<div class='sticky-ads-content'>
AD CODE HERE
</div></div>
Now 2nd option as if above the II paragraphs I give you the responsive bottom sticky ad with closing button, here I give you sticky ad option without closing button, using this option user can't close this ad widget.
Step 4: Now go to the blogger blog theme option and click the customize drop-down button and select the Edit HTML option, here in the starting you can easily find out the "<head>" tag then make some space below the <head> tag and paste the style code then click the Save button.
Bottom Sticky Ads style code:-
<style type="text/css"> .fixed-header{ overflow: hidden; position: fixed; z-index: 999999; bottom: 0px; height: <span style="color: red;">90</span>px; background: <span style="color: red;">#EEE</span>; } </style>
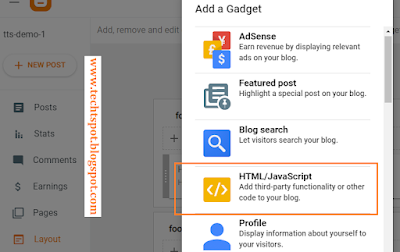
Step 5: Here go to the blogger Layout option do a little bit scroll up and you find out the blog footer area, now click the Add a gadget link.
Step 6: Now a new window appears middle of your device's screen and selects the HTML/JavaScript option.
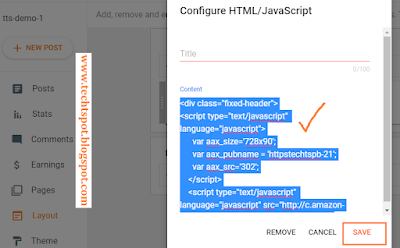
Step 7: Here we paste the second ad code in the Content area before that, we can insert our Ad in the II Ad space area (I use my affiliate ad) and click the Save button.
Bottom Sticky Ads:-
<div class="fixed-header">
AD CODE HERE
</div>
Step 8: Now again open the Blogger blog to check the Bottom Sticky Ad results.
Now Visit the - Demo Blog to see the result.
Above I give you my demo blog link, where I enable the Bottom Sticky Ads widget, if you are thinking to set up a Bottom Sticky Ads gadget in your blog then first look at the ad gadget how it looks like in my demo blog.
Read More:-
I hope you enjoy this Post. If any problem comment it.





Hello!!
ReplyDeleteUseful blog. Thank you for sharing with us.
Anyone want to know about Powertrac Euro 50 Next Price 2023 in India you can find all tractor related details on Tractorkarvan.